Showing posts with label Base Coat. Show all posts

Sunday, April 14, 2013

Blue frost for Autism, a new base, and a nostalgic love.

I failed at trying to do a flag-inspired mani last week, and I haven't gotten around to doing this week's challenge, so here's my mani that I did for Autism Awareness.


I used Color Club Chelsea, and sponged Wet'N'Wild Break The Ice for the tips.  I loved how shimmery and  frost-like it looked.


I bought the O.P.I. Original Formula Nail Envy at Marshall's for $7.99, and it came with this adorable charm bangle.


Also, I love Ring Pops.  One of my favorite candies from my childhood, along with those bug-shaped SweetTart-like candies in the jar that could be reused as a bug jar.


Saturday, April 6, 2013

A Grey Day

I used SinfulColors Snow Me White and Wet'N'Wild Wild Shine Black Creme and mixed them together for the grey base. I used Color Club Poptastic for the dots.


Bonus Easter nails using my new fan brush.  SinfulColors Candy Coated and Color Club Warhol.


Tuesday, March 26, 2013

Cinnamon Roasted Almonds and Stripes

A while back, I found an awesome garage sale find, a Back To Basics Nut Roaster.

I had wanted to get one of these as kind of a joke for my aunt, who has a love for Cinnamon Roasted Almonds, (Whenever we'd go somewhere they were, she'd exclaim "I smell my nuts!"), but I never ended up buying one and they disappeared from the shelves.  So when I found this one brand new and never used for $3, I snatched it up!  So now I make a batch of almonds to take to family get-togethers, and sometimes just because!

I've found that they're best when I dry-roast them in the oven first.  Not only do they taste better, but the whole house smells awesome!  I just toss them onto a cookie sheet/baking dish and put them in a 350 F degree oven for about 20-25 min (I've found that the time will vary depending on ovens, so just keep an eye on them near the end and make sure they don't get to dark).

After they've roasted, I put them in the pan and add the cinnamon and sugar, and turn the burner on to medium high heat. Then I add the water and vanilla extract.  Then you just slowly stir and stir and stir until the liquid evaporates and the nuts are glazed.

This is the recipe that came with the pan, you can tweak it depending on how much sugar/cinnamon/vanilla you'd like(just don't use a ton of cinnamon, you'll end up with a goopy mess that looks like tar!).  You don't have to use a special pan, any heavy bottomed pan will work (like cast iron).  

1 C sugar
1/2 Tbsp ground cinnamon
2 C nuts
1 1/2 tsp vanilla
1/4 C water

~~~~~~~~~~~~~~~~~~~~~~~~~~~~~~~~~~~~~

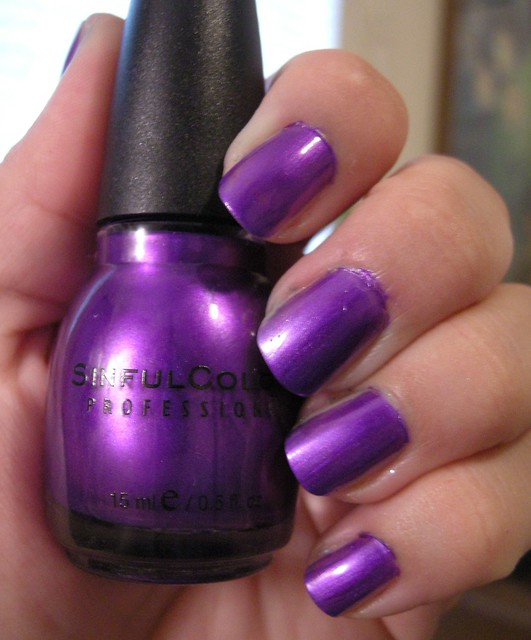
This week's nail challenge was stripes, and I just did a very simple design.  I used Wet'N'Wild Wild Shine Black Creme as a base color, then used N.Y.C. Matte topcoat on it.  I then painted a single stripe down the center of my nail with a shimmery dark cherry color polish, but that didn't really look nice to me.  So I got SinfulColors Let's Talk and painted over the red.  I loved the color combo, and also loved how pretty the shiny purple was against the matte black.

Sunday, March 3, 2013

Springtime!

I am in LOVE with SinfulColors new spring colors, especially Candy Coated!  It might be because it matches my eReader cover that I got for Valentine's Day.

I of course couldn't leave it alone, so I stamped with Sally Hansen Xtreme Wear in Celeb City.


I used the same Mash plate as the fish scales for the grid stamp, and one of the plates that came in my Salon Express stamping set for the dragonflies.


Tuesday, February 19, 2013

Color Club In True Fashion duo French Tips

Trying to get back into the habit of posting, and following the Challenge.  This week is French Tips, and my cousin Jen had suggested pairing 2 of my Color Club polishes together, so I figured I'd give it a shot.  I started with my normal nail strengthener and base coat.  I then used Wet'N'Wild Wild Shine in Black Creme as an undie for Color Club Personal Stylist.  Here's a shot I took before stamping and clean-up, to show off how gorgeous this color is!  This is 2 coats, with top coat.


I then used my MASH plate and stamped Color Club Editorial in the fish scale pattern.  I then did a french tip and added top coat.


It was insanely shiny and shimmery, and I didn't want to take it off!  I did eventually take it off, since it was starting to chip and snag.  This design reminded me of fishing lures for some reason as well.  I want to get more stamping plates!


Monday, February 11, 2013

Inspired by Nature

Things have finally started going back to normal around here, so I've resumed the 52 week challenge.  Last week's challenge was Inspired by Nature.  I decided to try to do a natural-looking nail, but with polish.  
I used Sally Hansen Smooth and Perfect in Dune as the base color, and Wet'n'Wild Megalast in Break the Ice for the tips.


Monday, January 28, 2013

Zoya Swatches

I still am in disbelief that I won  +Love For Lacquer 's giveaway!  These are my first Zoya polishes, I've been wishing to try this brand for a long time, especially after seeing they had polishes with the same names as The Charmed Ones, Pru, Piper, Phoebe, and Paige.  I got to choose 3 shades. Phoebe was sold out and Paige was a shade that I would likely never wear, so I chose Pru, Piper, and searched for a 3rd that would be a different color than what I have in my collection.  I finally decided on Jinx, and after seeing it on my nail I already have an idea for some nail art!

Box they came in, with an advert of all the polishes

Jinx, Pru, and Piper

inside with flash

outside in sun

Pointer finger is just basecoat, Middle Finger is 2 coats Jinx, Ring is 3 coats Piper, and Pinkie is 3 coats Pru.   no top coat in these pictures

Friday, January 11, 2013

Inspired by a Book

Trying to get back into blogging.  It's been a tough week.  Flew out for my Grandpa's funeral this past weekend, still haven't really gotten my head wrapped around the fact that he's gone.

I ended up breaking like 3 nails during my trip, my nails did not take well to the the cold.  This is what they looked like before I left:
Sally Hansen Smooth and Perfect Dune, stamping done with Salon Express plate with my SinfulColors red and green polishes.

And this is what they look like today:

SinfulColors Base Coat only.

I'd love to try to do a Cheetah print in honor of my friend +Jamie Cannon's books, but it just ends up looking like a mess. :( I need more practice and patience.  I also need the patience for waiting for Moon Rises, the sequel to Night Falls (also available on Kindle)

I promise I will be better about blogging in the future.

Tuesday, November 6, 2012

Gotta Catch'em All!

The choice for this week's nails was an easy one.  I've been wanting to do Pokeball nails for a long time, but haven't been able to get my nails long enough without breaking.  I love Pokemon, and am actually trying to collect all the games.  I'm slowly getting there, but having problems finding the Gold and Crystal versions for Gameboy Color within my budget.


Please excuse the horrible picture taking skills.  Probably should have done another coat of the red, but I was in a rush :)  I used Elmer's Glue as my basecoat, SinfulColors Snow Me White and Go Go, and Wet'N'Wild Black Creme.  No topcoat.  Striping brush for the black stripe, then dotting tool for the black and white button

This is 2 coats Snow Me White.  I love this white because it is so pigmented, but my bottle is needing a little thinner added to it, it has thickened up cause I left the cap off for to long a couple of times :(  I am also not really good at clean up on my right hand yet, but still better than it was lol.


Until next time
Jess

Sunday, November 4, 2012

Halloween Nails week 5

So late with posting this.  Orange polish is not a color I like on me, so trying to do something creative was difficult.  I finally was inspired while painting pumpkins with my son.  


The nails: 

I started out with a new base, that I got as an accident.  Was meaning to get more top coat while we were at Walmart (where we rarely go anymore), and wasn't paying attention to which one I grabbed.  Oh well, was needing base coat anyway!  Black Creme from Wet'N'Wild, then dotting with SinfulColors Snow Me White. My dotting was not very clean, as Snow is pretty thick, so there are little stringy things everywhere. I then went back with Color Club Wham! Pow! for my orange dots.  Cause it was for Halloween, I also used Wet'N'Wild's Fantasy Makers Glow in the Dark polish.  Ended up smudging the dots a bit, but it wasn't to obvious off-camera. Finished off with top coat.  The glow wasn't to obvious on Halloween, but I was also carrying around a giant glowstick while taking my son and my cousins' kids Trick or Treating.  

I need to find out how much the nail salons around here will charge just for shaping my nails, I just can't get them even when trying to square them off.

I wish I had remembered to take pictures while making the mini Oreo cheesecakes, so that I could make a proper post for them.  They were a big hit with my family, even my mom liked them.  

Until next time,
Jess

Tuesday, October 9, 2012

Stash and Set Up Post

While I'm trying to come up with a blue nail design for this week's challenge, I figured I'd post the polishes I have now at the start of this blog adventure, and my set up for now.  I usually end up doing my nails late at night, after my son goes to bed.  I have most of my stuff set up at my desk in my room, but I have a pair of clippers, a file, and a cuticle pusher on the cabinet next to my chair in the living room for when I want to fidget with my nails while watching a movie or something.  My buffing block is out there too right now, come to think of it.


Here's my desk set up.  The black and red box is usually over on the computer tower, and my tools pouch is usually under the monitor.  Chromebook (Cr-48, the Pilot Notebook from Google), my awesome Thermos that keeps w/e I'm drinking cold for hours.  Big bottle of pure Acetone, and a bottle of regular nail polish remover.  In the box is my SinfulColors and Insta-Dry polishes, and in the lid is the rest.  My top coat, Elmer's Glue base coat, and cuticle oil are up by the monitor.  Cotton balls, make-up sponges, and q-tips on top of the tower.  Tools in pouch, and a little glass tea light holder that I use to hold acetone for when i use my nail brushes (currently has a cotton ball in it that I used to wipe off excess cuticle oil from my finger nails).
The tools in my pouch:


I got the pouch at Big Lots for $4, had a bunch of Ms Manicure items.  Left side has nail clippers, cuticle nippers, dotting tool, cuticle pusher, nail file, and 2 brushes I got at Michael's, one for nail art and the other for clean-up.  Right side has toe separators, Salon Express stamper set, old gift card for scraping, Born Pretty Store Hello Kitty plate I got for free one random night, and 2 MASH plates I got for a penny each on Copious.  Paper hole reinforcement stickers and couple of orange sticks are also in there.  
 

Now for the polishes.

Kleancolor Chunky Holo Bluebell, Kleancolor Chunky Holo Purple, NYC Matte Top Coat, Color Changing Blue/Green chrome, O.P.I. Turquoise Shatter, O.P.I.Black Shatter
Sally Hansen:
Nail Prisms Lapis Amethyst, Xtreme Wear Invisible, Complete Manicure Black Platinum, Advanced Hard As Nails Strengthening Top Coat, Xtreme Nails Blinding Blue, InstaDri Brisk Blue, Crackle Overcoat Cherry Smash, InstaDri Rapid Red, InstaDri Blue-Away

 
Tokyo Pearl, Ruby Ruby, Snow Me White, Last Chance
Frenzy, Cinderella, Ciao Bella!
Sally Hansen Xtreme Wear Celeb City, SinfulColors What's Your Name, SinfulColors Queen of Beauty, Wet'n'Wild Black Creme, Wet'n'Wild Magnetic Igniting The Spark, and Wet'n'Wild Fantasy Makers Glow in the Dark Go With The Glow

I also have a SinfulColors Let's Talk, but my camera hates it and I can't get a close enough color accurate pic, so have a Google search image:

That's it for tonight, until next time
Jess